Thursday, 19 August 2021

BufferedOutputStream Class in Java


Java BufferedOutputStream Class

Java BufferedOutputStream class is used for buffering an output stream. It internally uses buffer to store data. It adds more efficiency than to write data directly into a stream. So, it makes the performance fast.

For adding the buffer in an OutputStream, use the BufferedOutputStream class. Let's see the syntax for adding the buffer in an OutputStream:

  1. OutputStream os= new BufferedOutputStream(new FileOutputStream("D:\\IO Package\\test.txt"));  

Java BufferedOutputStream class declaration

Let's see the declaration for Java.io.BufferedOutputStream class:

  1. public class BufferedOutputStream extends FilterOutputStream  

Java BufferedOutputStream class constructors

ConstructorDescription
BufferedOutputStream(OutputStream os)It creates the new buffered output stream which is used for writing the data to the specified output stream.
BufferedOutputStream(OutputStream os, int size)It creates the new buffered output stream which is used for writing the data to the specified output stream with a specified buffer size.

Java BufferedOutputStream class methods

MethodDescription
void write(int b)It writes the specified byte to the buffered output stream.
void write(byte[] b, int off, int len)It write the bytes from the specified byte-input stream into a specified byte array, starting with the given offset
void flush()It flushes the buffered output stream


 Example of BufferedOutputStream class:

In this example, we are writing the textual information in the BufferedOutputStream object which is connected to the FileOutputStream object. The flush() flushes the data of one stream and send it into another. It is required if you have connected the one stream with another.

  1. package com.javawindow;  
  2. import java.io.*;  
  3. public class BufferedOutputStreamExample{    
  4. public static void main(String args[])throws Exception{    
  5.      FileOutputStream fout=new FileOutputStream("D:\\test.txt");    
  6.      BufferedOutputStream bout=new BufferedOutputStream(fout);    
  7.      String s="Welcome to javaWindow.";    
  8.      byte b[]=s.getBytes();    
  9.      bout.write(b);    
  10.      bout.flush();    
  11.      bout.close();    
  12.      fout.close();    
  13.      System.out.println("success");    
  14. }    
  15. }  

Output:

Success

test.txt

Welcome to javaWindow.

FileInputStream class in Java

Java FileInputStream Class

Java FileInputStream class obtains input bytes from a file. It is used for reading byte-oriented data (streams of raw bytes) such as image data, audio, video etc. You can also read character-stream data. But, for reading streams of characters, it is recommended to use FileReader class.


Java IO


Java FileInputStream class declaration

  1. public class FileInputStream extends InputStream  

Java FileInputStream class methods

MethodDescription
int available()It is used to return the estimated number of bytes that can be read from the input stream.
int read()It is used to read the byte of data from the input stream.
int read(byte[] b)It is used to read up to b.length bytes of data from the input stream.
int read(byte[] b, int off, int len)It is used to read up to len bytes of data from the input stream.
long skip(long x)It is used to skip over and discards x bytes of data from the input stream.
FileChannel getChannel()It is used to return the unique FileChannel object associated with the file input stream.
FileDescriptor getFD()It is used to return the FileDescriptor object.
protected void finalize()It is used to ensure that the close method is call when there is no more reference to the file input stream.
void close()It is used to closes the stream.

Java FileInputStream example 1: read single character

  1. import java.io.FileInputStream;  
  2. public class DataStreamExample {  
  3.      public static void main(String args[]){    
  4.           try{    
  5.             FileInputStream fin=new FileInputStream("D:\\test.txt");    
  6.             int i=fin.read();  
  7.             System.out.print((char)i);    
  8.   
  9.             fin.close();    
  10.           }catch(Exception e){System.out.println(e);}    
  11.          }    
  12.         }  

Note: Before running the code, a text file named as "test.txt" is required to be created. In this file, we are having following content:

Welcome to javatwindow.

After executing the above program, you will get a single character from the file which is 87 (in byte form). To see the text, you need to convert it into character.

Output:

W

Java FileInputStream example 2: read all characters

  1. package com.javawindow;  
  2.   
  3. import java.io.FileInputStream;  
  4. public class DataStreamExample {  
  5.      public static void main(String args[]){    
  6.           try{    
  7.             FileInputStream fin=new FileInputStream("D:\\test.txt");    
  8.             int i=0;    
  9.             while((i=fin.read())!=-1){    
  10.              System.out.print((char)i);    
  11.             }    
  12.             fin.close();    
  13.           }catch(Exception e){System.out.println(e);}    
  14.          }    
  15.         }  

Output:

Welcome to javaWindow


FileOutputStream class in Java

 Java FileOutputStream Class

Java FileOutputStream is an output stream used for writing data to a file.

If you have to write primitive values into a file, use FileOutputStream class. You can write byte-oriented as well as character-oriented data through FileOutputStream class. But, for character-oriented data, it is preferred to use FileWriter than FileOutputStream.


OutputStream Hierarchy

Java output stream hierarchy


FileOutputStream class declaration

  1. public class FileOutputStream extends OutputStream  

FileOutputStream class methods

MethodDescription
protected void finalize()It is used to clean up the connection with the file output stream.
void write(byte[] ary)It is used to write ary.length bytes from the byte array to the file output stream.
void write(byte[] ary, int off, int len)It is used to write len bytes from the byte array starting at offset off to the file output stream.
void write(int b)It is used to write the specified byte to the file output stream.
FileChannel getChannel()It is used to return the file channel object associated with the file output stream.
FileDescriptor getFD()It is used to return the file descriptor associated with the stream.
void close()It is used to closes the file output stream.

Java FileOutputStream Example 1: write byte
  1. import java.io.FileOutputStream;  
  2. public class FileOutputStreamExample {  
  3.     public static void main(String args[]){    
  4.            try{    
  5.              FileOutputStream fout=new FileOutputStream("D:\\test.txt");    
  6.              fout.write(65);    
  7.              fout.close();    
  8.              System.out.println("success...");    
  9.             }catch(Exception e){System.out.println(e);}    
  10.       }    
  11. }  

Output:

Success...

The content of a text file test.txt is set with the data A.

test.txt

A

Java FileOutputStream example 2: write string

  1. import java.io.FileOutputStream;  
  2. public class FileOutputStreamExample {  
  3.     public static void main(String args[]){    
  4.            try{    
  5.              FileOutputStream fout=new FileOutputStream("D:\\test.txt");    
  6.              String s="Welcome to javawindow.";    
  7.              byte b[]=s.getBytes();//converting string into byte array    
  8.              fout.write(b);    
  9.              fout.close();    
  10.              System.out.println("success...");    
  11.             }catch(Exception e){System.out.println(e);}    
  12.       }    
  13. }  

Output:

Success...

The content of a text file test.txt is set with the data Welcome to javaWindow.

test.txt

Welcome to javaWindow.

Java I/O Stream

 Java I/O 

Java I/O (Input and Output) is used to process the input and produce the output.

Java uses the concept of a stream to make I/O operation fast. The java.io package contains all the classes required for input and output operations.

We can perform file handling in Java by Java I/O API.

Stream

A stream is a sequence of data. In Java, a stream is composed of bytes. It's called a stream because it is like a stream of water that continues to flow.

In Java, 3 streams are created for us automatically. All these streams are attached with the console.

1) System.out: standard output stream

2) System.in: standard input stream

3) System.err: standard error stream

Let's see the code to print output and an error message to the console.

  1. System.out.println("simple message");  
  2. System.err.println("error message");  

Let's see the code to get input from console.

  1. int i=System.in.read();//returns ASCII code of 1st character  
  2. System.out.println((char)i);//will print the character  

OutputStream vs InputStream

The explanation of OutputStream and InputStream classes are given below:

OutputStream

Java application uses an output stream to write data to a destination; it may be a file, an array, peripheral device or socket.

InputStream

Java application uses an input stream to read data from a source; it may be a file, an array, peripheral device or socket.

Let's understand the working of Java OutputStream and InputStream by the figure given below.

Java IO


OutputStream class

OutputStream class is an abstract class. It is the superclass of all classes representing an output stream of bytes. An output stream accepts output bytes and sends them to some sink.

Useful methods of OutputStream

MethodDescription
1) public void write(int)throws IOExceptionis used to write a byte to the current output stream.
2) public void write(byte[])throws IOExceptionis used to write an array of byte to the current output stream.
3) public void flush()throws IOExceptionflushes the current output stream.
4) public void close()throws IOExceptionis used to close the current output stream.

OutputStream Hierarchy

Java output stream hierarchy


InputStream class

InputStream class is an abstract class. It is the superclass of all classes representing an input stream of bytes.

Useful methods of InputStream

MethodDescription
1) public abstract int read()throws IOExceptionreads the next byte of data from the input stream. It returns -1 at the end of the file.
2) public int available()throws IOExceptionreturns an estimate of the number of bytes that can be read from the current input stream.
3) public void close()throws IOExceptionis used to close the current input stream.

InputStream Hierarchy

Java input stream hierarchy


RESTful Web Services


RESTful Web Services

REST stands for REpresentational State Transfer.

REST is an architectural style not a protocol.


Advantages of RESTful Web Services

Fast: RESTful Web Services are fast because there is no strict specification like SOAP. It consumes less bandwidth and resource.

Language and Platform independent: RESTful web services can be written in any programming language and executed in any platform.

Can use SOAP: RESTful web services can use SOAP web services as the implementation.

Permits different data format: RESTful web service permits different data format such as Plain Text, HTML, XML and JSON.

What is REST architecture?

REST stands for REpresentational State Transfer. REST is web standards based architecture and uses HTTP Protocol. It revolves around resource where every component is a resource and a resource is accessed by a common interface using HTTP standard methods. REST was first introduced by Roy Fielding in 2000.

In REST architecture, a REST Server simply provides access to resources and REST client accesses and modifies the resources. Here each resource is identified by URIs/ global IDs. REST uses various representation to represent a resource like text, JSON, XML. JSON is the most popular one.

HTTP methods

Following four HTTP methods are commonly used in REST based architecture.

  • GET − Provides a read only access to a resource.

  • POST − Used to create a new resource.

  • DELETE − Used to remove a resource.

  • PUT − Used to update a existing resource or create a new resource.

HTTP also defines the following standard status code:

  • 404: RESOURCE NOT FOUND
  • 200: SUCCESS
  • 201: CREATED
  • 401: UNAUTHORIZED
  • 500: SERVER ERROR

RESTful Service Constraints

  • There must be a service producer and service consumer.
  • The service is stateless.
  • The service result must be cacheable.
  • The interface is uniform and exposing resources.
  • The service should assume a layered architecture.

Advantages of RESTful web services

  • RESTful web services are platform-independent.
  • It can be written in any programming language and can be executed on any platform.
  • It provides different data format like JSON, text, HTML, and XML.
  • It is fast in comparison to SOAP because there is no strict specification like SOAP.
  • These are reusable.
  • They are language neutral.

Introduction to RESTFul web services

A web service is a collection of open protocols and standards used for exchanging data between applications or systems. Software applications written in various programming languages and running on various platforms can use web services to exchange data over computer networks like the Internet in a manner similar to inter-process communication on a single computer. This interoperability (e.g., between Java and Python, or Windows and Linux applications) is due to the use of open standards.

Web services based on REST Architecture are known as RESTful web services. These webservices uses HTTP methods to implement the concept of REST architecture. A RESTful web service usually defines a URI, Uniform Resource Identifier a service, provides resource representation such as JSON and set of HTTP Methods.

Creating RESTFul Webservice

In next chapters, we'll create a webservice say user management with following functionalities −

Sr.No.URIHTTP MethodPOST bodyResult
1/UserService/usersGETemptyShow list of all the users.
2/UserService/addUserPOSTJSON StringAdd details of new user.
3/UserService/getUser/:idGETemptyShow details of a user.

Let us start writing the actual RESTful web services with Jersey Framework. Before you start writing your first example using the Jersey Framework, you have to make sure that you have setup your Jersey environment properly as explained in the RESTful Web Services - Environment Setup chapter. Here, I am also assuming that you have a little working knowledge of Eclipse IDE.

So, let us proceed to write a simple Jersey Application which will expose a web service method to display the list of users.

Creating a Java Project

The first step is to create a Dynamic Web Project using Eclipse IDE. Follow the option File → New → Project and finally select the Dynamic Web Project wizard from the wizard list. Now name your project as UserManagement using the wizard window as shown in the following screenshot −
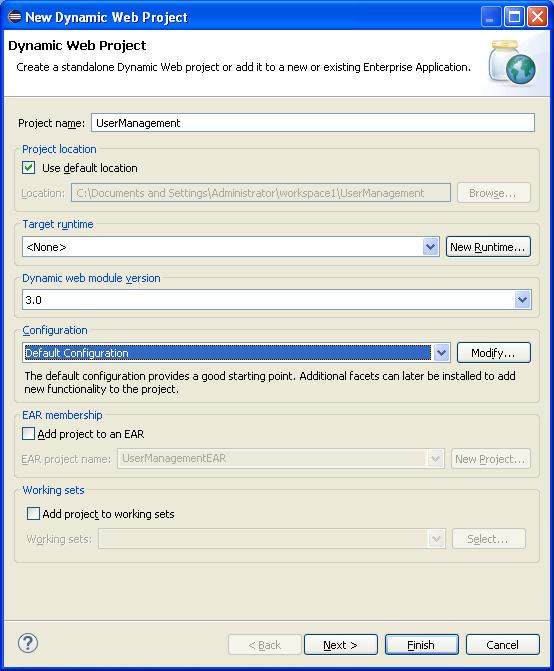
Dynamic Web Project Wizard

Once your project is created successfully, you will have the following content in your Project Explorer −
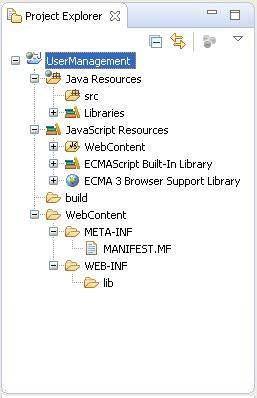
Usermanagement Directories

Adding the Required Libraries

As a second step let us add Jersey Framework and its dependencies (libraries) in our project. Copy all jars from following directories of download jersey zip folder in WEB-INF/lib directory of the project.

  • \jaxrs-ri-2.17\jaxrs-ri\api
  • \jaxrs-ri-2.17\jaxrs-ri\ext
  • \jaxrs-ri-2.17\jaxrs-ri\lib

Now, right click on your project name UserManagement and then follow the option available in context menu − Build Path → Configure Build Path to display the Java Build Path window.

Now use Add JARs button available under Libraries tab to add the JARs present in WEBINF/lib directory.

Creating the Source Files

Now let us create the actual source files under the UserManagement project. First we need to create a package called com.javawindow. To do this, right click on src in package explorer section and follow the option − New → Package.

Next we will create UserService.java, User.java,UserDao.java files under the com.tutorialspoint package.

User.java

package com.javawindow;  

import java.io.Serializable;  
import javax.xml.bind.annotation.XmlElement; 
import javax.xml.bind.annotation.XmlRootElement; 
@XmlRootElement(name = "user") 

public class User implements Serializable {  
   private static final long serialVersionUID = 1L; 
   private int id; 
   private String name; 
   private String profession;  
   public User(){} 
    
   public User(int id, String name, String profession){  
      this.id = id; 
      this.name = name; 
      this.profession = profession; 
   }  
   public int getId() { 
      return id; 
   }  
   @XmlElement 
   public void setId(int id) { 
      this.id = id; 
   } 
   public String getName() { 
      return name; 
   } 
   @XmlElement
   public void setName(String name) { 
      this.name = name; 
   } 
   public String getProfession() { 
      return profession; 
   } 
   @XmlElement 
   public void setProfession(String profession) { 
      this.profession = profession; 
   }   
} 

UserDao.java

package com.javawindow;  

import java.io.File; 
import java.io.FileInputStream; 
import java.io.FileNotFoundException;  
import java.io.FileOutputStream; 
import java.io.IOException; 
import java.io.ObjectInputStream; 
import java.io.ObjectOutputStream; 
import java.util.ArrayList; 
import java.util.List;  

public class UserDao { 
   public List<User> getAllUsers(){ 
      
      List<User> userList = null; 
      try { 
         File file = new File("Users.dat"); 
         if (!file.exists()) { 
            User user = new User(1, "Mahesh", "Teacher"); 
            userList = new ArrayList<User>(); 
            userList.add(user); 
            saveUserList(userList); 
         } 
         else{ 
            FileInputStream fis = new FileInputStream(file); 
            ObjectInputStream ois = new ObjectInputStream(fis); 
            userList = (List<User>) ois.readObject(); 
            ois.close(); 
         } 
      } catch (IOException e) { 
         e.printStackTrace(); 
      } catch (ClassNotFoundException e) { 
         e.printStackTrace(); 
      }   
      return userList; 
   } 
   private void saveUserList(List<User> userList){ 
      try { 
         File file = new File("Users.dat"); 
         FileOutputStream fos;  
         fos = new FileOutputStream(file); 
         ObjectOutputStream oos = new ObjectOutputStream(fos); 
         oos.writeObject(userList); 
         oos.close(); 
      } catch (FileNotFoundException e) { 
         e.printStackTrace(); 
      } catch (IOException e) { 
         e.printStackTrace(); 
      } 
   }    
}

UserService.java

package com.javawindow;  

import java.util.List; 
import javax.ws.rs.GET; 
import javax.ws.rs.Path; 
import javax.ws.rs.Produces; 
import javax.ws.rs.core.MediaType;  
@Path("/UserService") 

public class UserService {  
   UserDao userDao = new UserDao();  
   @GET 
   @Path("/users") 
   @Produces(MediaType.APPLICATION_XML) 
   public List<User> getUsers(){ 
      return userDao.getAllUsers(); 
   }  
}

There are two important points to be noted about the main program,

UserService.java

  • The first step is to specify a path for the web service using @Path annotation to the UserService.

  • The second step is to specify a path for the particular web service method using @Path annotation to method of UserService.

Creating the Web.xml configuration File

You need to create a Web xml Configuration file which is an XML file and is used to specify Jersey framework servlet for our application.

web.xml

<?xml version = "1.0" encoding = "UTF-8"?> 
<web-app xmlns:xsi = "http://www.w3.org/2001/XMLSchema-instance"  
   xmlns = "http://java.sun.com/xml/ns/javaee"  
   xsi:schemaLocation="http://java.sun.com/xml/ns/javaee  
   http://java.sun.com/xml/ns/javaee/web-app_3_0.xsd"  
   id = "WebApp_ID" version = "3.0"> 
   <display-name>User Management</display-name> 
   <servlet> 
      <servlet-name>Jersey RESTful Application</servlet-name> 
      <servlet-class>org.glassfish.jersey.servlet.ServletContainer</servlet-class> 
      <init-param> 
         <param-name>jersey.config.server.provider.packages</param-name> 
         <param-value>com.javawindow</param-value> 
      </init-param> 
   </servlet> 
   <servlet-mapping> 
      <servlet-name>Jersey RESTful Application</servlet-name> 
      <url-pattern>/rest/*</url-pattern> 
   </servlet-mapping>   
</web-app>

Deploying the Program

Once you are done with creating source and web configuration files, you are ready for this step which is compiling and running your program. To do this, using Eclipse, export your application as a war file and deploy the same in tomcat.

To create a WAR file using eclipse, follow the option File → export → Web → War File and finally select project UserManagement and destination folder. To deploy a war file in Tomcat, place the UserManagement.war in the Tomcat Installation Directory → webapps directory and start the Tomcat.

Running the Program

We are using Postman, a Chrome extension, to test our webservices.

Make a request to UserManagement to get list of all the users. Put http://localhost:8080/UserManagement/rest/UserService/users in POSTMAN with GET request and see the following result.
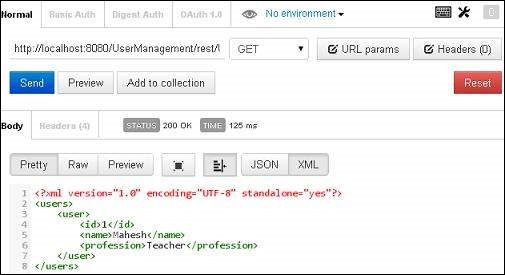
RESTful API, All users

Congratulations, you have created your first RESTful Application successfully.